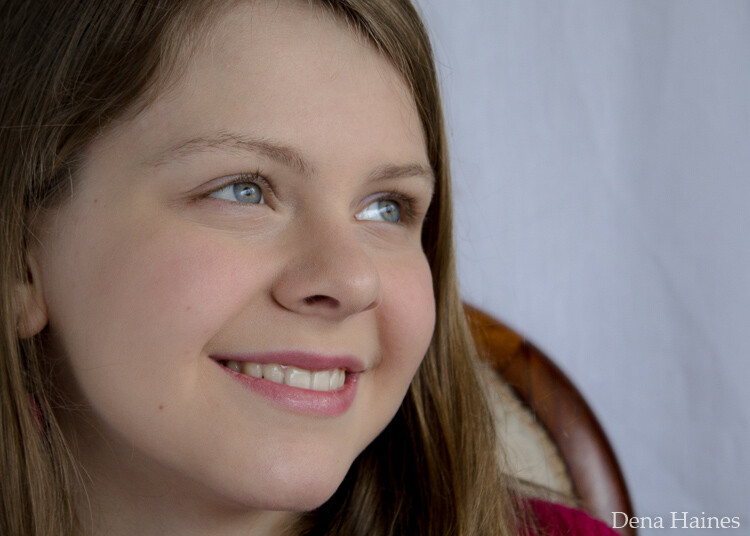
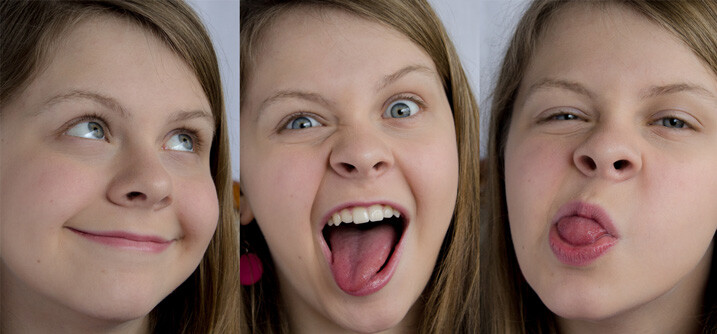
Friday 6 May 2016

8 Tips for Photographing Children


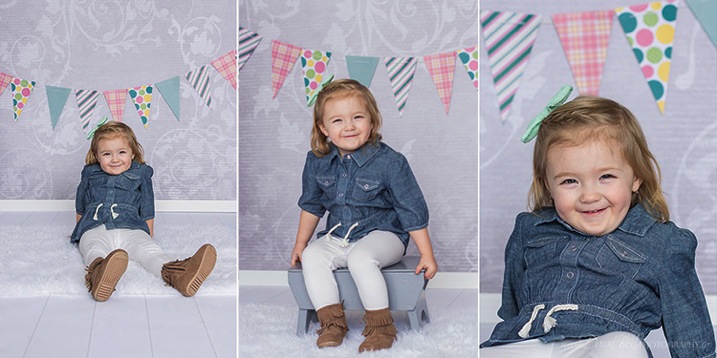
These organizational tips for photographing children will help you prepare yourself for some extended camera time with a child – whether you are a professional photographer prepping for a session with an advanced DSLR, or a parent with a simple point-and-shoot wanting to get some nice shots of your young children.

1. Timing and location

Time of day is really important. A photo session generally works best after a nap and snack when the child is the happiest. Also something to keep in mind is harsh light. Outdoors at midday when the sun is bright and strong is not ideal for photography.
A close second for importance is location. Outside is optimal and allows for lots of space to move around, but if you would prefer indoors (or it’s -40), make sure you have adequate space.
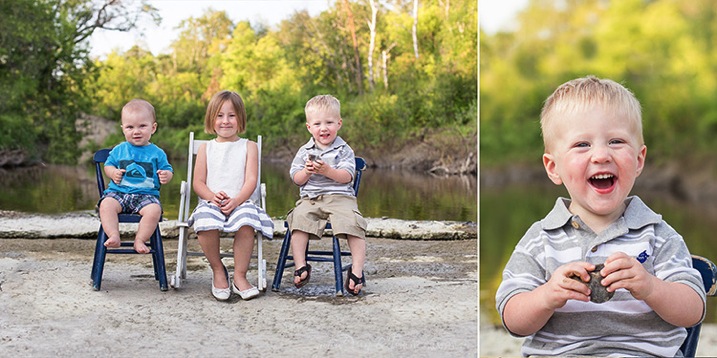
Kids chairs water summer

2. Be prepared

Both you and the little ones want this to go as fast as possible. If you waste too much time floundering around when you could be shooting, children get bored, antsy and quickly lose interest. Make a flexible plan and be prepared before you bring in the child. Have your camera (charged battery, lots of room on a memory card, check your settings) and props ready (hide any toys where they can be easily accessed and only bring them out if or when they are needed). If you are using various backgrounds, know ahead of time the order you would like them in, and make sure they are ready to go.

3. Make a list

Make yourself a list of potential non-posed shots such as: sitting, standing, laying down, playing, running, etc. – your child will not pose the same as the kids in Pinterest photos – and you don’t want them to. Look for ideas and themes, but don’t expect those exact poses. You want the picture to express who they are. Include activities that you have ready, as well as some back-ups such as snacks or a phone. Get any electronics you use to entertain them ready beforehand – their favorite Netflix episode ready-to-go, or an upbeat song already opened in iTunes just waiting for you to click play – however, these should only be options when you are desperate and have tried everything else. Be flexible with your list and ready to throw it out if needed.List

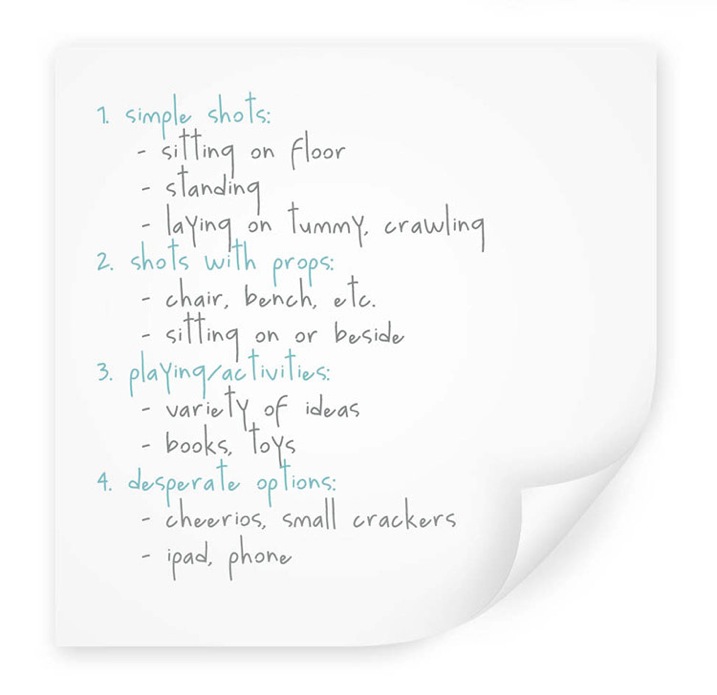
4. Get reinforcements

If possible, get some help. Ask your helper to stand directly behind you at first, not to the side – you want to try and get some pictures where the child’s eyes connect with the camera. For little ones your helper can plop them on a chair and quickly move away, while you wait ready with your finger on the shutter – you might only have two seconds to get the shot. Choose someone who can get them smiling and laughing. They will also help you keep your sanity when photographing your own kids.

5. Start with poses

Take the most posed, formal, look-at-the-camera pictures first. For example, a sibling shot where you want them all looking at the camera and smiling. You still might not get it, but this is where you have a chance.
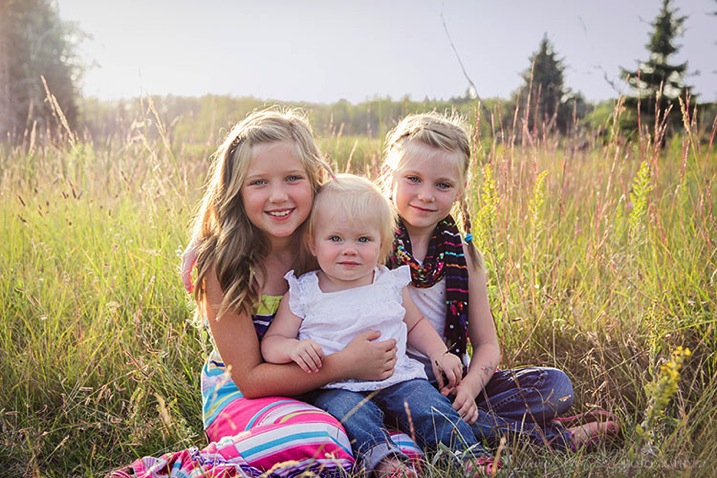
Sisters posed

6. Limit movement

Limit their movement at the start: A chair, stool, couch, basket, swing, etc. Just be flexible and don’t force it – a picture somewhere else is better than a red, blotchy, crying face. I will sometimes keep a chair or prop hidden until it’s time to use it. Stick a fun chair down where you want them to be, and see if they naturally head over there to explore. You might get lucky and have them crawl up there on their own. But they might not want to sit on the chair at all – move on, or let them stand holding onto it, or sit on the floor next to it. Come back later if you feel they are not ready. If not, just ditch it. You might have lots of ideas and only actually use a few of them.Boy chair

7. Let them play

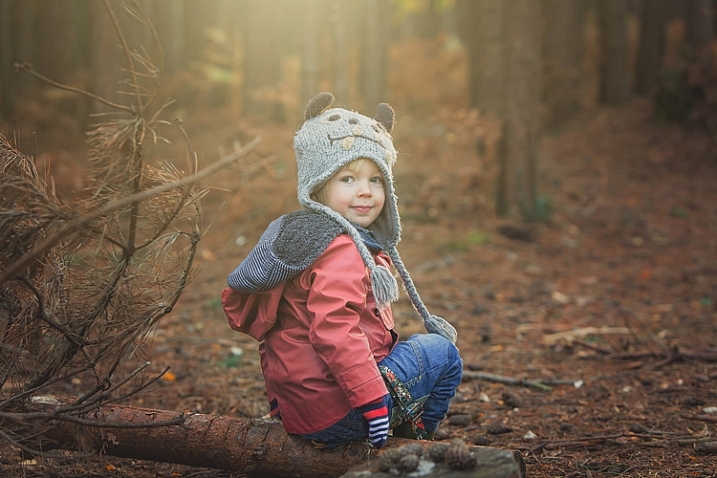
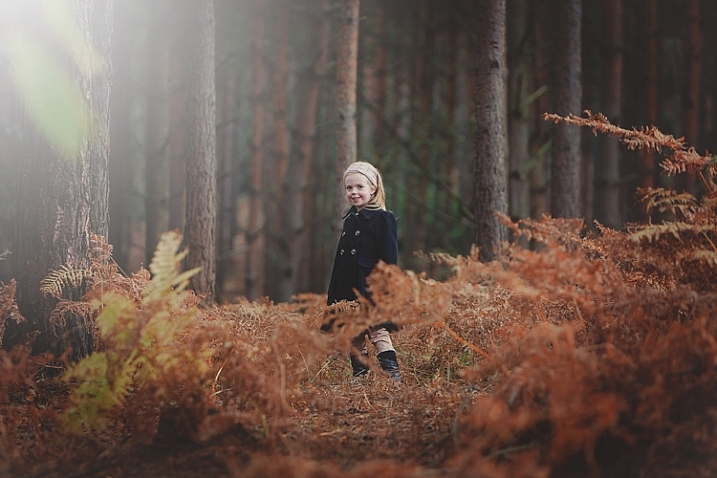
Let them play after you have tried the formal, posed shots. Don’t try too much posing or force them to sit still; you are in for a battle, and they will likely win. Consider centering the rest of the session around an activity they enjoy, or a new one that you think might be a hit – in the yard with the sprinkler, at the park on the slides, walking along the beach to collect shells and go adventuring, tea party outside, flying a kite, jumping on the trampoline, bucket full of soapy water on the grass, etc. Music can also be helpful – a fun little dance party, maybe? Unless you have a kid that really likes to run far away, outside is an excellent option – kids love to have room to move around, and a big space affords more options.
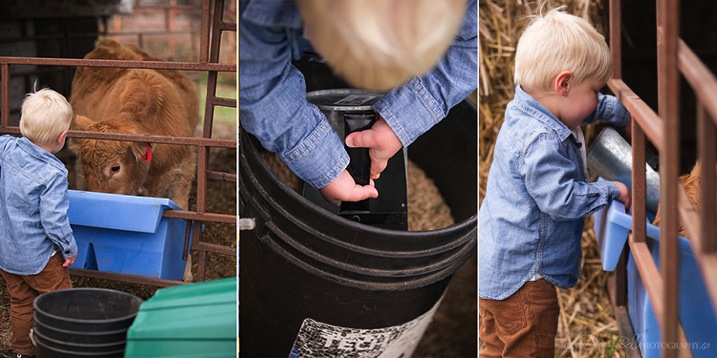
Feeding cows boy

8. Relax

Take a deep breath and relax! Kids can sense your stress, and it transfers onto them (and usually makes them do the opposite of what you want).
Do you have any other tips for photography children? Please share in the comments below.
Dawn Bell is a family, child, and wedding photographer in Manitoba, Canada. Her absolute favorite subjects are children - there is nothing quite like the expressions and giggles that naturally tumble out of them! She is also a pastor’s wife and mom to two beautiful girls. To see more of her work, you can check out her website and Facebook page. For some behind-the-scenes and glimpses of her personal life, you can also find her on Instagram.

Tuesday 26 April 2016

How To Find Your Lens’ Sweet Spot: A Beginner’s Guide to Sharper Images

A Post By: Dena Haines
Are you tired of blurry images?
It’s time to learn how to capture sharper images by finding your lens’ sweet spot. This will give you more confidence, save time, and help you take better photos.
In this article you’ll learn:
  • How to find your lens’ sweet spot (for sharper images)
  • Why you should shoot in Aperture Priority mode (and how to use it)
  • How to perform a test to get your sharpest image every time
  • How important is your lens’ sweet spot? Notice the differenceMid range aperture sharper than wide open
  • In the above images of the clock, the one on the right is sharper. Look closely at the words and at the leaves behind the clock. The f/9 image is sharper throughout because it was shot in my lens’ sweet spot. The f/3.5 one was not.

    First, take a look at your lens

    In this beginner’s guide, we’ll use an entry level zoom lens as our example. Most kit lenses (the basic lens that comes with a DSLR) generally shoot their sharpest at the mid-range aperture settings. To determine the mid-range of your lens, you’ll need to know its widest (or maximum) aperture setting. It is located on the side, or end, of the lens and will look something like this 1:3.5-5.6.
    For example, here it is on my Canon 18-55mm zoom lens.Lens aperture rangeThis means that when my lens is zoomed all the way out, its widest aperture is f/3.5. When zoomed all the way in, its widest aperture is f/5.6.
    The rule to finding that mid-range sweet spot, is to count up two full f-stops (aperture settings are called f-stops) from the widest aperture. On my lens, the widest aperture is f/3.5. Two full stops from there would bring me to a sweet spot of around f/7.
    Use this chart to count your f-stopsRobin ParmarThere is some wiggle room in the mid-range, so anything from f/7 to f/10 will capture a sharp image. Once you know the mid-range of your lens, you can do an easy test to get your sharpest image. To perform the test you’ll need to shoot in Aperture Priority mode.

    Take control with Aperture Priority Mode

    Shooting in Aperture Priority allows you to choose the aperture setting you want, which gives you more creative control than Automatic mode. By controlling the aperture setting, it’s much easier to get a sharp image, and because your camera still chooses the ISO (if you are set to Auto ISO) and shutter speed automatically, it’s very easy to use.
    You’ve probably heard that apertures like f/16 and f/22 are best for keeping everything in focus. While that can be true, focus does not always equal overall sharpness. Choosing a mid-range aperture will give you sharper images throughout. You can improve them even further by reducing camera shake with a tripod and a remote shutter release (or your camera’s self-timer).
    Here’s an example of how shooting in your lens’ sweet spot will give you sharper images.Sharp images shot in lens sweet spotMid range f stop sharper than small f stop
  • In the above split-image, the f/9 image is sharper than the f/22 one. The needles and shadows are not as soft or blurry as in the f/22 shot (look at the crispness and sparkles in the snow too).

    Switching from Automatic to Aperture Priority Mode

    To take your camera out of Automatic and put it in Aperture Priority, just turn the large Mode Dial to Aperture Priority. This is what that looks like on my Canon (on Nikon and other brans look for the A).Aperture priority on canon mode dial
  • Automatic mode is the green rectangle; Aperture Priority mode is the Av (or A on a Nikon). Once your camera is in Aperture Priority mode, turn the smaller Main Dial (shown here on the top of my Canon) to choose your f-stop.Main dial canon

  • As you turn that dial, you’ll see the f-number changing on your screen. In the next picture, it’s set to f/9.5.Aperture setting on canon LCD screen

    Perform a Lens Sweet Spot Once you have your camera set up on a tripod, performing a sweet spot test only takes a couple of minutes. To begin, put your camera in Aperture Priority mode, then compose your shot and take a photo at varying apertures. Start out with the widest, then click that main dial a couple of times (to the right) and take another. Keep doing that until you’ve taken seven or eight photos.

    Upload your photos to your computer and zoom in on them. You’ll quickly see which aperture settings gave you the sharpest overall image.
    This next photo of my daughter was shot using natural light. Shooting in my lens’ sweet spot gave me a pretty sharp image, even in this low light setting.Mid range aperture sharp image low lightFind your lens sweet spot for sharper imagesThe close up of the mugs shows the advantage of shooting in the lens’ sweet spot. Whenever you want to make sure you get the sharpest capture possible, take a shot at each mid-range setting f/7, f/8, f/9, and f/10.
    Getting Your Sharpest Images
    Now that you know your lens’ sweet spot, it’s time to practice. I hope you’re as pleased with the results as I’ve been!Mid range aperture for sharper images
  • I love shooting in natural light, and learning how to capture sharper images in low light has made me so much happier with my photos.

    Tips for capturing your sharpest images:

    • Shoot in Aperture Priority mode
    • Choose a mid-range aperture (usually f/7 to f/10)
    • Use a tripod and a remote shutter release (or your camera’s self-timer) to reduce camera shake
    • Take a series of shots at f/7 through f/10 when a sharp capture is especially important
    But don’t stop here. Keep playing with settings in Aperture priority mode. It’s awesome to get images that are sharp throughout, but there’s a lot more to aperture than that.
  • Also read: 

    4 Steps on How to Read Images and Learn to Replicate the Results

Saturday 23 April 2016

4 Steps on How to Read Images and Learn to Replicate the Results

Post By: Daniel Smith
Earlier, I wrote an article called: why asking what camera settings were used may not be as helpful as you think, and in it, I touched on the concept of reading an image.
Learning to read images – from a technical perspective and not a conceptual one – is something that I believe all photographers must be able to do, as it allows you to get a rough guide on what settings may have been used to create an image. They won’t be the exact settings; but you’re most likely not going to have the exact same lighting environment as what a particular photo was taken in.Shallow Apeture 1

Dive in to read an image

To begin reading images you must have, at the very least, a good understanding of aperture,shutter speed and to a lesser extent, ISO. You’ll want to understand how these things affect the image in different ways. For example, if you saw an image with a lot of motion blur, you would know from your understanding of shutter speed that a slower shutter speed was used.
As you become more proficient with lighting and off-camera flash, you can even read how the subject was lit with artificial lighting, and begin to replicate how it was done. But don’t worry! This article will be focussing on the three major aspects of photography exposure (aperture, shutter speed and ISO) to help you begin your journey to reading images.Slow Shutter 2

Step 1: Shutter Speed – Fast or Slow?

I find that determining whether a fast or slow shutter speed was used first, can help greatly when it comes to determining aperture and ISO later. The first thing you will want to ask yourself when assessing shutter speed is; was it fast or slow? This can be decided by how much, or how little, motion blur is present in the image, as that is what shutter speed controls.
If everything in the image is pin sharp, and there is absolutely no motion blur at all, then a fast shutter speed would have been used. However, if there is a lot of motion blur, then a slow shutter speed was used.
Here are some points that you can take out of knowing if the shutter speed is fast or slow:
Shutter Speed Table
But how fast is a fast shutter speed, and at what point does the shutter speed become slow? To answer this, think of your shutter speed in relation to your subject’s speed. For example, when photographing sports or other fast action, you may find using a shutter speed of 1/1000th is required to freeze your subjects. This is because your subjects are moving quite fast. However, if you were to photograph people walking down the street, you would not need the same shutter speed, as your subjects are not moving as fast.
Below are examples of slow and fast shutter speeds. Notice the presence of motion blur in the images where a slower shutter speed was used, but action is frozen with a fast shutter speed. In images that will use a slow shutter speed, it is often recommended you use a tripod to stabilize your camera, and prevent camera shake.
What isn’t important is knowing the exact shutter speed; that is something that you will be able to experiment with to get the results you want. All you are doing here is identifying if a slow or fast shutter speed was used, to give you a starting point.Slow Shutter 3Fast Shutter 2Slow Shutter 4Fast Shutter 1

Step 2: Aperture – Large or Small?

Also read:Tips for photographer Doing Fall Portraits


Another way you can determine the aperture is by looking for bokeh, or subject isolation. The more bokeh that is present in the image, the more the subject is isolated. To achieve this, the photographer would use a larger aperture. On the other hand, if everything in the image is in focus, then the photographer employed a smaller aperture to increase their depth of fieldSmall Aperture 1Shallow Aperture 2
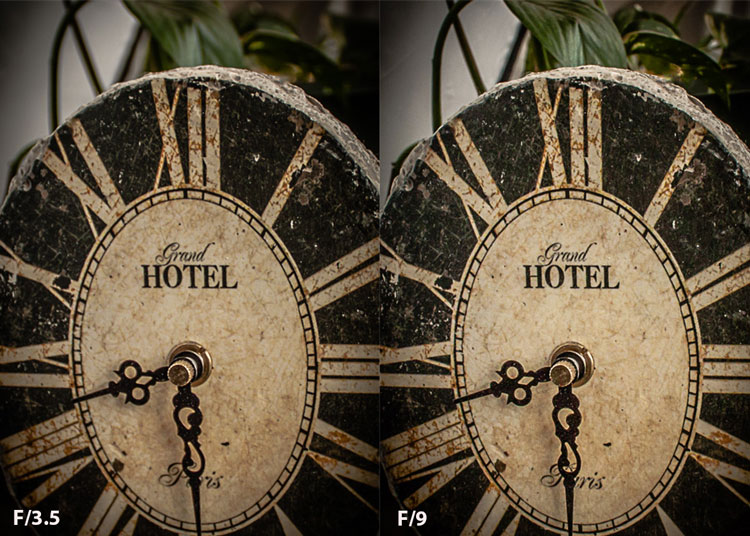
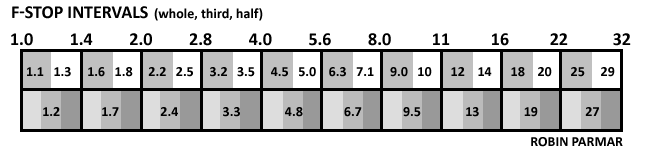
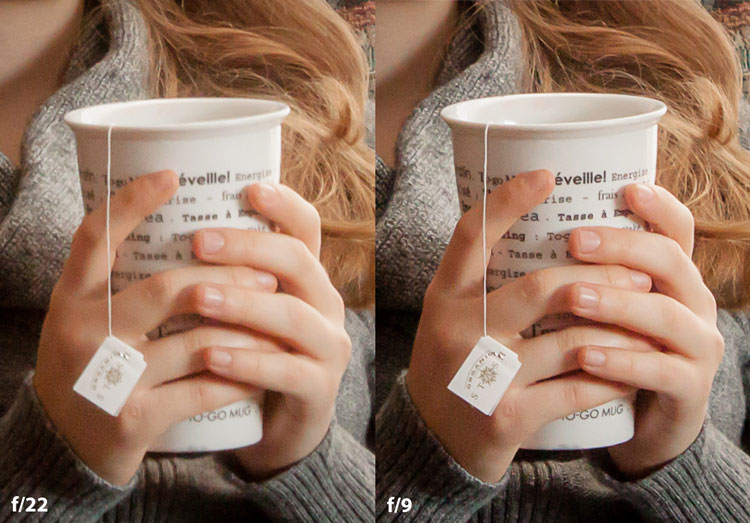
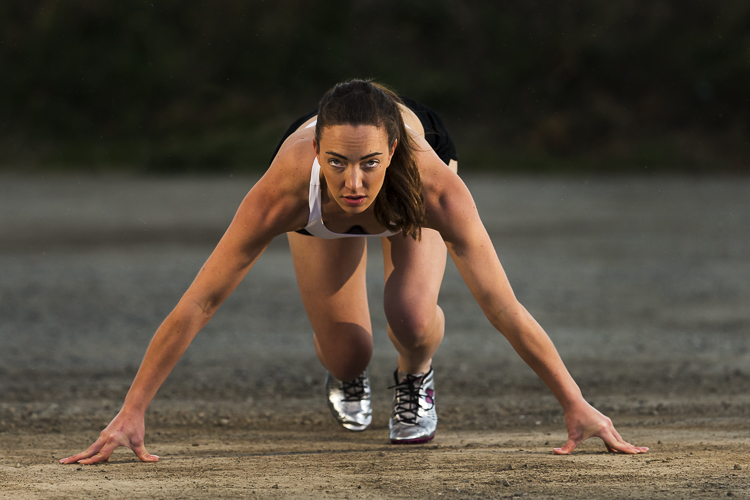
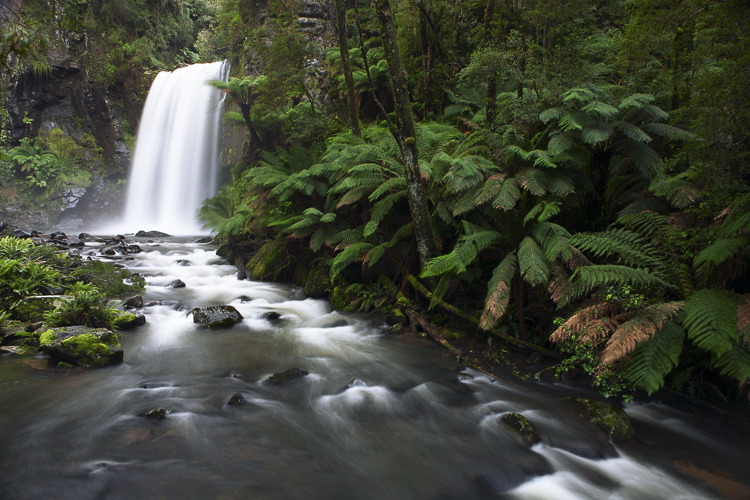
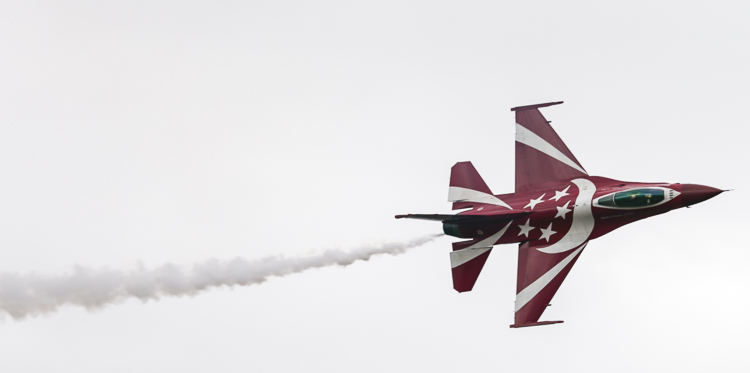
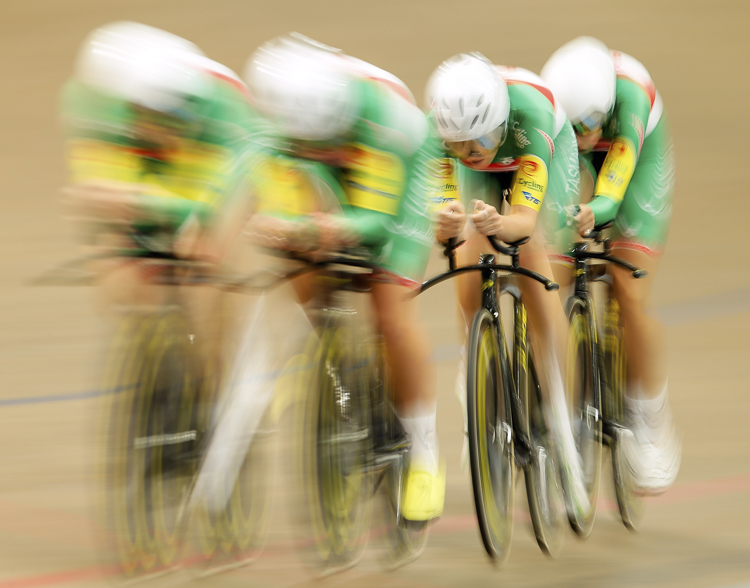
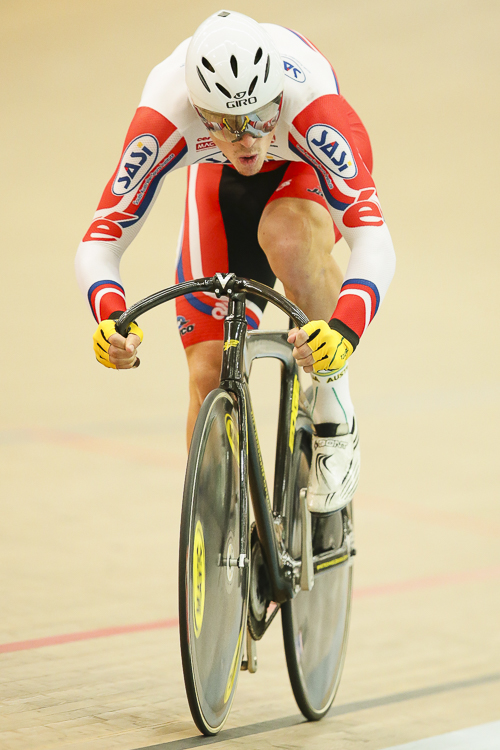
In step one I mentioned that determining whether a fast or slow shutter speed was used first, can greatly help you in determining the aperture. Here’s why. If you are familiar with the exposure triangle you will know that in nearly all cases when a fast shutter speed is used, it is associated with a large aperture (small f-number). Conversely, the slower the shutter speed, the smaller the aperture becomes. So if you see a photo that has motion blur present, it is highly likely that the photographer used a smaller aperture; or if you see a photo where moving objects are frozen, the photographer has most likely used a larger aperture to enable a faster shutter speed.

Step 3: ISO

Also read: HTC 10 First Look

ISO is one of the parameters that isn’t so important in determining what settings may have been used when reading an image. Use ISO to get the settings that you need to use, to create the shot you want. For example, if you want to use the slowest shutter speed you can, set your camera’s ISO to its lowest setting. Conversely, if you want to use a very fast shutter speed, you may find that you have to increase your ISO.

Step 4: Focal Length

Focal length is something that is often overlooked in images, but it is a very important element indeed. It does more than simply allow a photograph to add more in the frame, or zoom in closer. Different focal lengths evoke different emotions in the viewer when looking at an image. For instance, if a wide angle lens was used, it places the viewer in the scene and can make them feel like they were there; whereas a longer focal length places the viewer further away from the subject, and evokes a more voyeur emotion.
Also read: https://embassydetails.com/consulate-general-of-algeria-in-new-york-united-states
The great thing about focal length is that it is quite easy to distinguish approximately which one was used. To make it simpler, breaking down focal lengths in to three groups can help greatly.
  • Wide: <50mm (i.e. 14-50mm on full frame, 10-35mm on cropped or APS-C sensor)
  • Normal: ~50mm-85mm (35-56mm cropped sensor)
  • Telephoto: 85mm+ (130mm+ on cropped sensor)
You can use the presence of compression to distinguish the different types of focal length. A wide angle lens accentuates the foreground and increases distances in the frame, as well as having a very wide field of view. This effect increases as the focal length decreases – or gets wider. On the other end, a telephoto lens will give you much more compression, and make distances in the frame look shorter. Their field of view will decrease, and the affects of aperture, particularly larger apertures, will be more pronounced. That’s why f/2.8 at 16mm looks different than f/2.8 at 200mm, if your subject is kept the same size in the frame.
Here is a small table with examples of the same scene photographed from the same point, but with different focal lengths.
Image courtesy of Canon
Now you have had a quick introduction on how to read images. Remember, knowing the exact settings is not important, but knowing how to get an approximate guess is better than not knowing anything at all! With experience, you will become more proficient at reading images, and will be able to guess with more precision. The more you understand aperture, shutter speed, and ISO, the better you will be at reading images.
Along the way, you will also learn that different genres within photography use a different set of settings. For example, most landscape photographers will use smaller apertures, lower ISOs, and slower shutter speeds; whereas sports shooters for instance, will generally use higher ISOs, larger apertures, and faster shutter speeds.
Daniel Smith is originally from Melbourne, Australia, but now resides in the UK. He specializes in sport and editorial photography and is a photographer with Getty Images. You can see more of his work at Carbon Photographics, and by following him on Instagram.

Tuesday 5 April 2016

12 Tips For Indoor Natural Light Photography

A Post By: Dena Haines
Feeling frustrated with indoor photography?
Harsh shadows and weird skin tones are common problems. In this article, you’ll learn how to improve your indoor photography.
natural light photography indoors

12 tips for indoor natural light photography

Working with natural light indoors can be a little tricky. These beginner tips will help you create beautiful photos using natural light.

Also read:

WhatsApp adds end-to-end encryption: What is it and what does it mean for you?


1. It’s all about the windows and doors

You’ll want to get to know the light that comes through them. Sometimes it floods the room softly. Other times it beams in, bouncing off the walls and floor.
Soft light will add a soft glow, and harsh light will give a dramatic or moody look.indoor natural light photography tips 2
indoor natural light photography tips 2
Take note of what kind of light enters each room throughout the day.
The color of light also changes during the day. It has a warmer look at sunrise and sunset. During midday, it has a cooler or neutral color. Use this to add different effects to your photos.

2. Turn off the lights

Natural light doesn’t like competition. Electric lights can affect your white balance. This is because the color of light varies with the source. Skin tones can look odd when artificial light mixes with natural light. The easiest way to fix this problem is by turning off all electric lights.

3. Shoot in Aperture Priority mode

In Aperture Priority mode, you choose the aperture. With indoor natural light photography, you need to let in as much light as possible. To do that, you’ll want a wide open aperture. The lower your aperture number (f-stop), the wider your aperture is open.
When you use a wide aperture, your depth of field will be shallow. So your subject will be in focus, while your background is left soft and blurry. This adds a beautiful effect to portraits and product shots.indoor natural light photography
indoor natural light photography
For portraits, an aperture of around f/5 or f/6 will keep the entire face in focus. Focus on the eyes for best results.
Note: Also shooting in RAW is better than JPEG for indoor natural light. RAW files give you a lot more to work with when editing.aperture priority for indoor natural light photos
aperture priority for indoor natural light photos
Aperture Priority is marked with either an AV (Canon cameras, pictured above) or an A (Nikon cameras). To adjust the setting, you’ll turn the small dial (pictured on the right).

4. Choose your White Balance

To get good white balance take your camera out of Auto White Balance (AWB). The button for changing white balance is usually marked with a WB somewhere on the back of the camera (or use your Canon Quick menu if you shoot that brand).
For proper skin tones choose Daylight (the one with the picture of the little sun). This will give good results, not too blue and not too yellow. If you want to warm things up a little, choose Cloudy. This will add more yellow. Try a shot with Daylight, then one with Cloudy, and see which looks right or which you prefer.
You can adjust your White Balance while editing (if you shoot in RAW) but getting it right while shooting makes editing easier.

5. Use a light catching backdrop

A backdrop will help catch the light and bounce it back on your subject.light catching backdrop for natural light photography
light catching backdrop for natural light photography
In the above image, the white material helps to cradle the light around the flowers.catch natural light with a backdrop
catch natural light with a backdrop
This backdrop is made with a freestanding collapsible clothes rack and a long piece of white material. I love how easy it is to set up and move around.

Also read:Tips for photographer Doing Fall Portraits

6. Use a light box

light box will create a similar effect as the backdrop, but it will help control the light even more.use a natural light light box for indoor photos
use a natural light light box for indoor photos
I made this light box out of Lego and used the same piece of white material pictured in tip #5.tips for natural light photos
tips for natural light photos

 7. Use a reflector

A reflector is used to bounce natural light back on your subject.use a reflector for natural light photographytips for indoor natural light photography
use a reflector for natural light photography
tips for indoor natural light photography
For these shots, I used a reflector and the backdrop. My daughter was sitting with her left side facing the window. She was holding the reflector in her right hand, which helped lighten the shadows.

8. Use a mirror

A mirror is another great way to control natural light. Hang a mirror in the window. I used a large suction cup with a hook to hang the mirror.indoor natural light photography tips
indoor natural light photography tips
Have your model look in the mirror. As you take your shot make sure your reflection is not in the mirror. It can take some patience to get the angles and reflections under control, but it’s worth it.
I used a small handheld mirror for this shot. A larger mirror would require less cropping.tips for indoor natural light photos
tips for indoor natural light photos

9. Tidy up

There are often things lying around the house, especially if you have kids. This clutter can be distracting in a photograph. It’s worth taking a couple minutes to tidy up before you start shooting.
In a small space, a backdrop can serve a double purpose. It will control light and create a blind to background clutter. It can help make a small space more workable. For most of the photos in this article, I pushed our sofa and table into the middle of our living room, so I could set up in front of our largest window. Without the backdrop, this location wouldn’t work.natural light photography indoors 2
natural light photography indoors 2

10. Place your subject close to the window

Place your subject a foot or two away from the light source. This way you’ll make the best use of the natural light, and avoid the harsh contracts that can be created by being too close to the window/door. Try backlit, side lit, and full light by having your model face different angles to the window. 

11. Use the curtains

Use curtains or blinds to help diffuse harsh light. When the sun is beaming into the room, the light can blow out your photos. Pulling the curtains can soften the light and help with proper exposure. If the curtains are not suitable, you could use a sheer piece of material to hang over existing curtain rods.

Also read:Uber In Pakistan Review & Free Ride Invitation Code

12. Shoot reflective objects

Natural light can turn the most common thing (like the moisture on the window pictured below) into something beautiful.natural light on glass objectsnatural light on reflective objects 
natural light through water on the window
natural light on glass objects
natural light on reflective objects
natural light through water on the window
Have fun playing around with reflective objects and natural light. I love the way light creates reflections and glistens on shiny/iridescent objects.

You’ve got to love it

It’s easy to love indoor natural light photography.
The setup is inexpensive, portable, and easy; and you can create beautiful photos no matter the weather or time of day. Don’t forget to have fun, and let that inner beauty shine through.have fun with natural light
have fun with natural light

Your turn

Let me know how your experimenting goes by commenting below. I can’t wait to see what you create. Please share your photos as well.

Friday 11 March 2016

Tips for photographer Doing Fall Portraits

written by: Sean Gannon 
Autumn provides photographers with an abundance of colours and amazing light. When captured right, autumn can create images which are the envy of everyone.
For family photos, autumn can provide you with amazing backdrops, and a variety that can be matched by no other season. For this article, I took my own two children for a walk in the woods to do some fall portraits. Photographing other people’s children is always easier than your own, so I thought it would be a great exercise, and we may also even get some nice pictures of our own children for once. So here are some fall portrait tips to get you started.
Gannon-Studios-2
Autumn Portraits 4

Preparation

Preparation is the key to any successful shoot. Of course ensuring your camera equipment is charged, you have clear cards, and your gear is clean seems like a no brainer, but it’s often the fundamentals that we overlook. Clearing cards can be daunting for those starting out, but just double check that you have downloaded everything, then use the Format function (in the camera) that will give you a completely clear card. There are rumors that deleting single images in-camera can lead to corrupting the card, so it’s best to use the Format function.
Make sure you check the weather. Here in the UK, as well as many other parts of the world, it can change quickly at this time of year. Check with a few sources about local weather. It’s such a pain to get everyone together, get in the car and travel for some time, only to be rained out. Although, even rain in autumn can provide some great image opportunities, if you are dressed correctly.
Gannon-Studios-1
Sunrise and sunset can give us the best light. However, dragging your family out of bed for a photo shoot is always going to be tough. Aim to start your shoot about an hour before sunset.This Golden Hour is favored by many professional portrait photographers, as the light is more flattering and you may even get a great sunset. You can look up sunset times for your local area. It can be surprising how early it gets dark, and you want at least a good hour of shooting before the sun goes down.
Make sure everyone dresses appropriately. It’s getting colder, and it’s one less thing to worry about if everyone is warm during the walk back to the car. While we still think it’s lovely and warm outside, believe me, it gets cold pretty quick when the sun starts to go down. Also have a change of clothing available for everyone. It can be wet and muddy and some of us are prone to falling over!
Make sure you bring snacks and drinks. Especially if you are photographing children. They will get bored and hungry way before you do, so anything to help keep them going while you master that perfect shot the better.
Editor’s note: if you are photographing other people’s kids have the parents bring snacks that the kids like. Never give food to other people’s kids without asking the parents, there may be allergies or special diets.

Clothing advice for portrait photographers:

Clothing choices are always important for portraits, but in fall it can really make a difference to your image. Try and have everyone wear natural tones that will either compliment the colours of the leaves and trees, or blend in. My son wore a dark red sweater, as we knew the area had very vivid reds in the trees. My daughter wore black and white which is a timeless combination that blends in well. My son also wore a grey hood that coordinated with his sister.
Autumn Portraits
Try and avoid clashing patterns or colours amongst your subjects by discussing it in advance, and maybe come up with a colour theme that everyone can include. Also avoid t-shirts or sweatshirts that have dominant logos. If he could, our son would have Star Wars logos on everything. This can of course date an image, and is also very distracting.
Try and have a few changes of clothes available. This will not only provide variety in your images, but in the wet and possibly muddy conditions, you may well need them, especially for any children.

Location

Location is essential for any shoot, but for autumn you want to find the best colours and textures you can. Things can change really quickly. The leaves can change over a couple of days, but it often doesn’t happen until later than you think. For this article, we actually struggled to find autumn colours despite it being early October. You also need to check that the leaves are still there. A heavy wind can take them down overnight, so don’t wait too long after you have scouted your spot to shoot.
We searched online for arboretums, these are great places that have collections of interesting trees. Of course, your local forest would be great too.
Autumn Portraits 2
Use social media for location tags to see what other people have photographed over the last few days, at or near the same location. Instagram, Twitter and even Trip Advisor are fantastic for this. You may also get to see a great place that you may not have found otherwise.

The technical bits

For my shoot, I was using a Canon 5D Mark 3 and took the 24-70mm f/2.8 Mark 2, and the 70-200mm f/2.8 Mark 2. These of course are professional cameras and lenses, but any modern camera whether a DSLR, point and shoot, or even a smart phone should provide great images. In fact, I find the iPhone 6 has great range of colours and light.
If you are using a DSLR, you can really play with the aperture (f-stops) to get a range of looks without moving location. To get a super blurry background, set your aperture to the lowest number. On my lens, this is f/2.8. Some lenses can go lower and some are limited to higher setting. Even with a kit lens that comes with your camera, you should be able to get to around f/5. If you want the leaves and your family in focus, try increasing the aperture to f/8 or even f/22. Do be careful though because at f/22 your shutter speed will be significantly slower, and you may well need to increase your ISO to compensate.
Depth of field guide f2 8
Depth of field guide f8
Depth of field guide f22


I photographed the images above in Aperture Priority (AV on a Canon, and A on a Nikon). This is when you decide the aperture and the camera sets the shutter speed. Keep an eye that the shutter speed doesn’t geet too slow (1/60 as a minimum). If it does, increase your ISO.
Personally, I always shoot in RAW. For me it just allows me that flexibility afterwards. However, with modern cameras, JPEGs are very versatile, and don’t break up as much as they used to. Some cameras allow you to capture a RAW and JPEG at the same time. This is great so you have the RAW to go to if need be.
White Balance: for these images, I shot in cloudy White Balance. It warmed up the colours, although I did alter these in Camera RAW processing later, it did give me a great starting point. If you are using your manufacturer’s own software, you should be able to change the white balance quite easily.

Getting natural smiles and reactions from children

You know your own children very well. You know the songs they like and what gets them interested. However, they are also very comfortable around you, and may decide to walk off just as you get your camera settings right. Here are a few tips to get a natural reaction.
As in the images in this article. I asked my children to laugh hysterically for no reason at all. This got a huge overreaction which although is a great animated image, is not what we were after. What did happen is that as they calmed down from that, they had natural smiles. They thought it was funny and continued smiling naturally.
Posing Idea 1
If you have more than one child, ask one to tell the other a secret. This will always get them giggling.
Posing Idea 2Posing Idea 3
With just one child, ask them to tell you or the camera anything that they are interested in. Our son will talk for hours about anything Star Wars or Marvel. With our daughter we can ask her math questions, which gets a range of reactions.
Sing them a song but get it wrong. For some reason, this is the funniest thing ever to kids. Basically, do anything to distract them or get a reaction, but not by saying CHEESE!

Editing your images

For editing, I used Camera RAW processor which is part of Photoshop. However, most cameras come with editing software, or you can use something like Lightroom which is quite affordable. I actually kept the editing quite simple. The main thing I did was to go to the saturation panel and increased my Reds, Greens and Yellows. This really brought some punch to the image.
Before and After Editing

And finally…

Please print your images in some way. As parents, we are great at taking images, but not doing anything with them. Don’t worry about capturing the most amazing image, just get something that captures your family and print it some way.
Sean Gannon 
 which specialises in corporate headshot photography across the UK. He works with large corporate clients, photographs hundreds of colleagues, and works with professional individuals, to create headshots for use in print, as well as their own websites, and of course social media such as LinkedIn and Twitter. With national coverage, Headshots UK have a network of photographers to capture business portraits wherever their clients are based.